Revised 2/1/2016
Full Ramps
Application and Design
E Z Road Products TempRamps are designed and sold for use as temporary ramps in 55 mph, non-interstate roads. The molded plastic ramp sections are designed to provide a smooth, safe, temporary transition for traffic at milled butt joints, bridges, steel plates, or end-of-day joints. (TempRamps are not designed for supporting traffic over a gap in the pavement such as over a utility cut, but may be used as a transition against steel plates.)
We have prepared the following tool list and instructions to help assure your satisfaction with our product. Before making your first on-site installation of TempRamps, we recommend that you practice screwing down the ramps in your construction yard to prove out your tools and equipment and to get a feel for the installation procedure.
Installation Tools Needed
• Cordless Rotary impact drill/driver or
• 110 volt rotary hammer with an SDS chuck (We use a Bosch “Bulldog” Roto-Hammer #11228) and 3KW or larger generator and heavy-duty extension cord. (An under-powered rotary hammer heats up and loses driving torque in asphalt and dulls drill bits in concrete.)
• No.40 Torx bits for driving TempRamp screws plus adapter to convert SDS chuck to 3-jaw chuck for Torx bits. (We use the Bosch SDS-Plus Adapter.)
• SDS shank masonry drill bits for pre-drilling. We recommend having SDS bits on hand with a 10-inch effective drill length (excluding the SDS shank) in diameters of 3/16" for asphalt and 9/32" for concrete.
Installation Instructions
1. Make sure that the pavement surface for mounting the TempRamps is flat and clean.
2. Fasten TempRamp sections to the pavement with the torx head structural screws (plastic - head barely touching ramp, rubber - head to dimple ramp surface). Install (6) screws in each PTR2-48 TempRamp section and (4) screws in each PTR2-29 TempRamp section in the recommended pattern shown below. (Screws are not required in every guide hole molded into the ramps.) In very heavy traffic conditions, consider using 6-inch screws in place of 4-inch and additional screws near the thin edge of the ramps.
PTR2-48
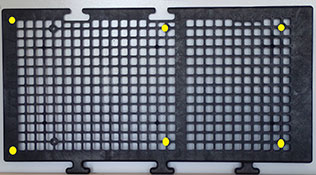
(6) 4" GRK-RSS Anchors
(6) 4" GRK-RSS Anchors
PTR2-29
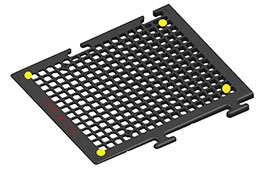
(4) 4" GRK-RSS Anchors
3. You may drive structural screws directly into the asphalt without pre-drilling, however we recommend drilling for better holding power and this allows you to reuse the screws; you should feel torque through the tool. Be careful to not spin the screw after it tightens. (For extremely hard asphalt mix, pre-drill with a 3/16" masonry bit, but no larger for asphalt.)(4) 4" GRK-RSS Anchors
4. For installing TempRamps on concrete, pre-drill a 9/32" screw holes at least one (1) inch deeper than the screw length before driving the screws. For best results and optimum drill life, apply a moderate amount of down pressure to keep the masonry bit cutting and pull out the drill frequently to clear out the chips. (Too much down pressure or chips packed in the hole will cause the bit to overheat and fail. Also, an under-sized generator or too small extension cord under-powers the rotary hammer resulting in premature bit failure and possibly serious damage to the rotary hammer.)
5. We recommend that structural screws grip a minimum of about 3.0 inches of asphalt or about 1.5 inches of concrete. If you hit concrete below asphalt when driving the screws, you will need to pre-drill as described above and use a longer screw to make sure the screws grip at least 1.5 inches of concrete. Note: Never use any screws shorter than 3.875" to install TempRamps.
6. Structural screws are GRK – 3/8 RSS structural screws and are available in 4, 6, and 8-inch lengths from lumberyards or other dealers in your area. (In very hard concrete, 6" and the 8" screws require a 9/32" SDS drill bit which can be special ordered from E Z Road.)
7. When using TempRamps at End-of-Day joints, first screw the ramp sections to the pavement. Rake the asphalt against the ramps. Then roll the first pass down the ramp to keep the asphalt tight against the ramp for a straighter joint.
Quality
1. E Z Road Products TempRamps are designed for temporary use on streets, roads and highways up to 55 mph and have performed successfully in thousands of installation sites since the 2001 construction season. TempRamps can be used in both wet and dry conditions, but should not be used when snowplows are in use.
2. If you plan to leave TempRamps in place for more than one to three days, we recommend periodically checking the installation to assure that no screws have loosened. Also, we recommend that new TempRamp users check the ramp after one day's traffic to confirm the proper installation technique has been used.
3. If a screw does loosen up, it was probably over-torqued in asphalt, pre-drilled too large in concrete, or installed where there was insufficient base material to grip. It is also possible the screw broke off below the surface because the hole was pre-drilled too small in concrete. Remove any loose screws and re-install an inch or so away from the original hole. (It is not necessary to install through the guide holes that are molded into the ramp.)